


Are you ready to cast a delicious spell this Halloween? These easy Halloween macarons are not just a treat for the taste buds, but a feast for the eyes as well. Imagine biting into a crisp, chewy macaron shell only to discover a sweet, creamy filling that screams festive fun!
Perfect for both seasoned bakers and beginners alike, this recipe is a surefire way to impress at any Halloween party. And if you’re looking for a fun family activity, gather your little ghouls and goblins to join in the baking fun.
What are Halloween Macarons?
Halloween Macarons are a delightful fusion of spooky aesthetics and mouthwatering flavors, perfect for celebrating the haunting season.
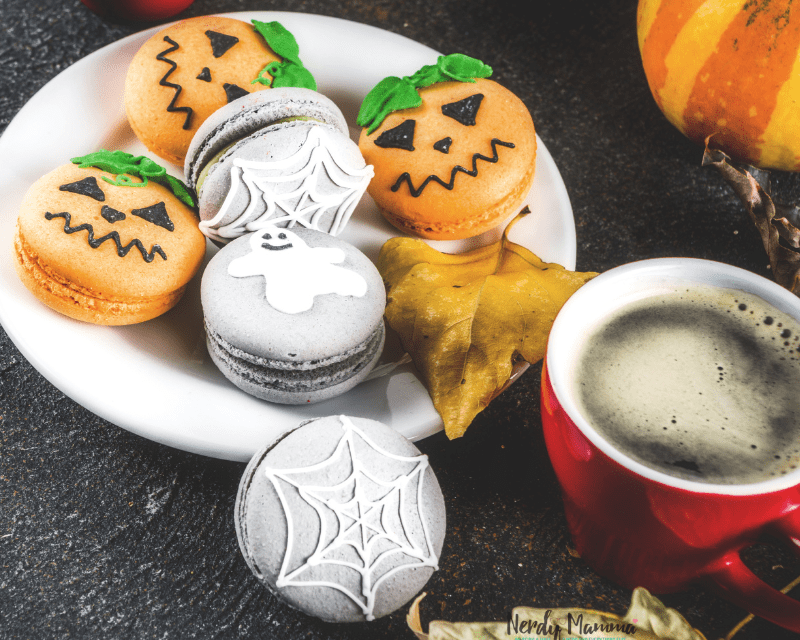
These colorful treats are often decorated with ghostly whites, eerie blacks, and pumpkin-inspired oranges, and filled with flavors like vanilla buttercream, pumpkin spice, chocolate ganache, or raspberry.
They not only tantalize the taste buds but also serve as a visually striking addition to any Halloween party, making them both a delicious and decorative choice.
Pairing your Halloween Macarons with spiced apple cider brings a cozy autumnal touch to your festivities, as the warmth and spice of the cider perfectly complement the sweet and chewy treats.
Adding a bowl of crunchy caramel popcorn enhances the macarons’ flavors with a delightful texture, and the sweet-salty mix is always a crowd-pleaser.
For a richer contrast, dark chocolate bark, with its slightly bitter notes, beautifully balances the macarons’ sweetness. Get creative by topping the bark with nuts or dried fruits for an extra layer of flavor.
Halloween Macarons Ingredients
For the Cookies:
4 oz. confectioners sugar (113.3g) – This brings sweetness to your cookies and gives them a soft texture.
2 oz. almond flour – Recommended Bob’s Red Mill (56.6g). Almond flour provides a moist texture and a slightly nutty flavor to the cookies.
1 oz. granulated sugar (28.3g) – Provides an additional sweet factor and also aids in the perfect browning of your cookies.
1/4 tsp. salt – This enhances the overall flavor of your cookies creating a balance of sweet and savory.
2 oz. egg whites – Roughly two eggs at room temperature, egg whites give your cookies a light and fluffy texture.
1 tsp. vanilla (optional) – Or you can use your favorite extract, for a hint of aromatic flavor.
A few drops of Orange GEL food color – Gives your cookies a playful, fun orange color.
For the Filling:
1 stick softened butter – (I used a vegan buttery stick). Butter provides moisture, richness, and flavor to your filling.
1 1/2 cups powdered sugar – It sweetens the filling and gives it a thick texture.
2 tbsp. Heavy Whipping Cream – Gives your filling a creamy, velvety texture.
1 tsp. vanilla (optional) – Or you can use your favorite extract, to enhance the flavor of the filling.
A few drops of Orange GEL food color & A few drops of Green GEL food color – To give your filling a vibrant color variation for added visual appeal.
For the Icing:
2 cups powdered sugar – It sweetens your icing and provides a smooth and glossy finish.
1/3 cup corn syrup – Helps to harden your icing and give it a shiny appearance.
1 tbsp. coconut milk – Like what you use in cereal is fine (or regular milk), for a hint of tropical flavor and creamy texture.
A few drops of Silver or gray GEL food color, a few drops of green GEL food color & a few drops of black GEL food color – For decorating your cookies with a variety of colors to make them eye-catching and festive.
How to Make Halloween Macarons
Now that you have the ingredients, it’s time to make these delectable cookies!
COOKIES:
- Start by weighing out all your ingredients.
- Sift together the almond flour and powdered sugar in a large bowl and set it aside.
- Mix egg whites in a mixer on medium speed until they get frothy, then add in the salt.
- Gradually add your granulated sugar to the egg whites and continue mixing on a medium speed until you achieve a soft peak consistency.
- The vanilla is added next to the meringue mixture before folding in the dry ingredients.
- Add about one-third of the dry mixture to the egg whites and fold in. Do the same with the remaining dry mixture until there are no dry spots.
- Check for the “ribbon” stage of the batter – it should fall off in ribbons and a figure 8 without breaking off can be formed. Once you reach this consistency, stop folding.
- Divide the batter into two and color each with a few drops of orange or silver/gray GEL food color.
- Load your batter into piping bags and pipe onto a macaron template placed under a silicon mat on a baking sheet. The key is to keep the piping bag completely vertical when piping and lift it straight up.
- Once all the batter is piped, bang the baking sheet on the counter multiple times (10-20 times should do it) to remove air bubbles.
- Allow the macarons to dry on the counter for 30-60 minutes until a “shell” has formed over them. Bake at 300 degrees for 10-15 minutes, ensuring the macarons don’t wiggle around when touched. They should be completely cool before being removed from the baking sheet.
FILLING:
- Beat the softened butter, cream, powdered sugar, and vanilla until thoroughly combined.
- Separate the filling into two parts and color each with orange or green GEL food color.
- Once colored, freeze the fillings for 5-10 minutes until they’ve thickened slightly but remain soft enough to pipe.
ASSEMBLY:
- The assembly process involves pairing up similar-sized macarons and piping a generous amount of buttercream on the flat side of one cookie from each pair.
- Top it off with the other half of the pair and refrigerate overnight to age.
- Don’t forget to color-coordinate: orange-colored buttercream for the orange-colored macarons and green-colored buttercream for the silver-colored macarons.
- Lastly, create the icing and divide it into three parts. Color two of the parts with green and silver food coloring and leave one in its natural white color.
- Use piping bags to create leaf, face, cobweb, and ghost designs on the cookies.
- Once all the cookies are decorated, refrigerate for at least 10 minutes or until the icing is set. Store them in the fridge for 24-48 hours to let them “mature”.

Tips for Making This Recipe
- Weigh your ingredients: Cooking is an art, but baking is a science. Ensuring you have the exact amount of each ingredient is crucial for these delicate cookies.
- Use gel food colors: Unlike liquid types, gel food colorings give intense, vibrant colors without altering the texture of your batter or icing. They’re also easy to mix in.
- Achieve the right ‘ribbon’ consistency: When folding your egg whites and dry ingredients, aim to achieve a ‘ribbon’ stage where the batter falls off in ribbons and you can make a figure 8 without it breaking off.
- Let the piped batter rest: After piping your macarons onto a baking sheet, let them rest for 30-60 minutes. This creates a shell on the macarons that makes them crunchy on the outside and soft on the inside.
- Match your cookies: When they’re done baking, pair cookies of similar sizes together. This ensures uniformity when they are filled and sandwiched together.
- Age your macarons: After assembly, allow your macarons to ‘mature’ in an airtight container in the fridge for 24-48 hours. The filling flavors seep into the shells, giving you a cookie that’s perfectly chewy and flavorful.
- Experiment with decorations: Unleash your creativity when it comes to decorating. From creating spooky faces to intricate cobwebs, there’s no limit to what you can do.
Frequently Asked Questions
How difficult is it to make Halloween Macarons?
While macarons have a reputation for being a bit tricky, this Halloween version is designed with simplicity in mind, making it a great project for both seasoned bakers and ambitious beginners. With a little patience and attention to detail, you’ll have spooky treats ready for all your ghosts and goblins!
Do you have any decoration tips for these macarons?
Absolutely! Use edible markers to draw fun faces or spooky designs on the macaron shells. You can also sprinkle edible glitter or use Halloween-themed sprinkles. Let your creativity run wild to make them uniquely festive!
How should I store Halloween Macarons?
Store them in an airtight container in the refrigerator for up to a week. If you need to store them longer, you can freeze them for up to a month. Just bring them to room temperature before serving for the best texture.
Are there any dietary considerations for this recipe?
These macarons are naturally gluten-free since they use almond flour. However, if you or your guests have nut allergies, you might want to consider a different treat. As always, check all ingredients for potential allergens to ensure everyone’s safety.
Conclusion
And voila! You’ve now mastered the art of making these delightfully spooky Halloween Macarons. Just as they have for so many others, these macarons will surely cast a delicious spell on anyone who tries them.
Remember, the key to success with this recipe is patience and precision, but your hard work will definitely pay off when you bite into these petit sweet delights.
We’d love to see how your Halloween Macarons turned out! Don’t hesitate to share your baking triumphs with us. Take a picture of your finished macarons and share it on our website or on social media.
We also appreciate your feedback, so please rate this recipe and let us know how well it worked for you. Your photo could inspire other bakers to try this recipe and join our community of home cooks. Happy baking!
And one more thing and this is really important, I highly suggest having a look at these 12 Tips for Perfect Macarons. There is more to learn there, too.

Easy Halloween Macarons Recipe
Whip up some Easy Halloween Macarons! Fun and festive, these spooky treats are perfect for parties and Halloween celebrations.
Ingredients
COOKIES
- 4 oz. confectioners sugar (113.3g)
- 2 oz. almond flour I recommend Bob’s Red Mill (56.6g)
- 1 oz granulated sugar (28.3g)
- 1/4 tsp. salt
- 2 oz. egg whites, roughly two eggs at room temperature
- 1 tsp. vanilla (optional) or you can use your favorite extract
- A few drops of Orange GEL food color
FILLING
- 1 stick softened butter (I used a vegan buttery stick)
- 1 1/2 cups powdered sugar
- 2 tbsp. Heavy Whipping Cream
- 1 tsp. vanilla (optional) or you can use your favorite extract
- A few drops of Orange GEL food color
- A few drops of Green GEL food color
Icing for the Decorations
- 2 cups powdered sugar
- 1/3 cup corn syrup
- 1 tbsp. coconut milk, like what you use in cereal is fine (or regular milk)
- A few drops of silver or gray GEL food color
- A few drops of green GEL food color
- A few drops of black GEL food color
Instructions
COOKIES
- Weigh out all of your ingredients.
- Sift together your almond flour and powdered sugar in a large bowl and set aside.
- Add your egg whites to the bowl of your mixer and start mixing on a medium speed until they get frothy. Add in the salt.
- Gradually add your granulated sugar to the egg whites and mix at a medium speed until you get a soft peak consistency. Beat in the vanilla to the meringue mixture before adding in the dry ingredients.
- Add about 1/3 of the dry mixture to the egg whites and fold in until there are no dry spots left.
- Add in the remaining dry mixture to the meringue and fold in until there are no dry spots. Begin to check for the “ribbon” stage, where the batter falls off in ribbons and you can make a figure 8 without it breaking off. Once you get to this consistency stop folding.
- Divide the batter into 2 and place in 2 separate bowls. On the first bowl, put the orange food coloring a drop at a time until you get the right shade. Do the same on the 2nd bowl with Silver or gray gel food coloring.
- Prepare your 2 piping bags with a medium round tip. 1 for the orange color batter and 1 for the silver color batter. Place your bag in a large cup to make it easier to add your batter. Slowly add in your batter.
- Place the macaron template under a silicon mat on a baking sheet.
- Hold your piping bag completely vertical when piping and lift straight up. Making cookie dough dots the size of the circles on the template under your silicon mat.
- After you have piped all the batter, bang the baking sheet on the counter 10-20 times (seriously) to remove all air bubbles. Use a toothpick or something sharp to pop any remaining bubbles.
- Now it is time to let them dry. Leave them sitting on the counter for 30-60 minutes until you can touch them and you can feel that a “shell” has formed over them. No batter should come off on your finger.
- Preheat your oven to 300 degrees F. and bake your macarons for 10-15 minutes or until lightly browned. When you touch the top of the macaron it should not wiggle around.
- Allow them to cool COMPLETELY before taking them off the baking sheet.
BUTTERCREAM FILLING
- Place the softened butter, cream, powdered sugar, and Vanilla into a large bowl
- Beat using an electric mixer until thoroughly combined.
- Divide the filling in half and place in 2 separate bowls.
- Color the first filling with orange gel food coloring 1 drop at a time until you get the right shade of color. Do the same in the second filling with green gel food coloring.
- Place the 2 bowls in the freezer for 5-10 minutes, or until the icing has thickened slightly but is still soft enough to pipe. Transfer to piping bags with medium tips.
Assembly
- When macarons have cooled, place them in similar-sized pairs.
- On the flat side of one cookie from each pair, pipe a generous amount (about one tablespoon) of Buttercream. Orange-colored buttercream on the orange-colored macarons. Then Green colored Buttercream for the silver-colored macarons.
- Place the top shell on and refrigerate in an air-tight container overnight to age.
DECORATING THE EASY HALLOWEEN MACARONS
- To make the Icing: Mix your coconut (or regular) milk, powdered sugar, and 1/4 cup of your corn syrup together. If it’s still too dry, add more corn syrup. You want thick icing – but not so thick that you can’t push it through a piping bag & tip. Add 1/2 Tbsp of coconut milk or water if necessary to loosen up, and beat an additional 2 minutes.
- Divide the mixture into thirds and place in separate small bowls.
- On the first bowl, place a drop or two of green food coloring. Blend well. Then place in a small piping bag with a leaf piping tip
- On the second bowl, place a drop or two of the silver or gray food coloring. Then place in a small piping bag with a small round tip
- On the third bowl, use the icing in its natural white color. Then place in a small piping bag with a small round tip
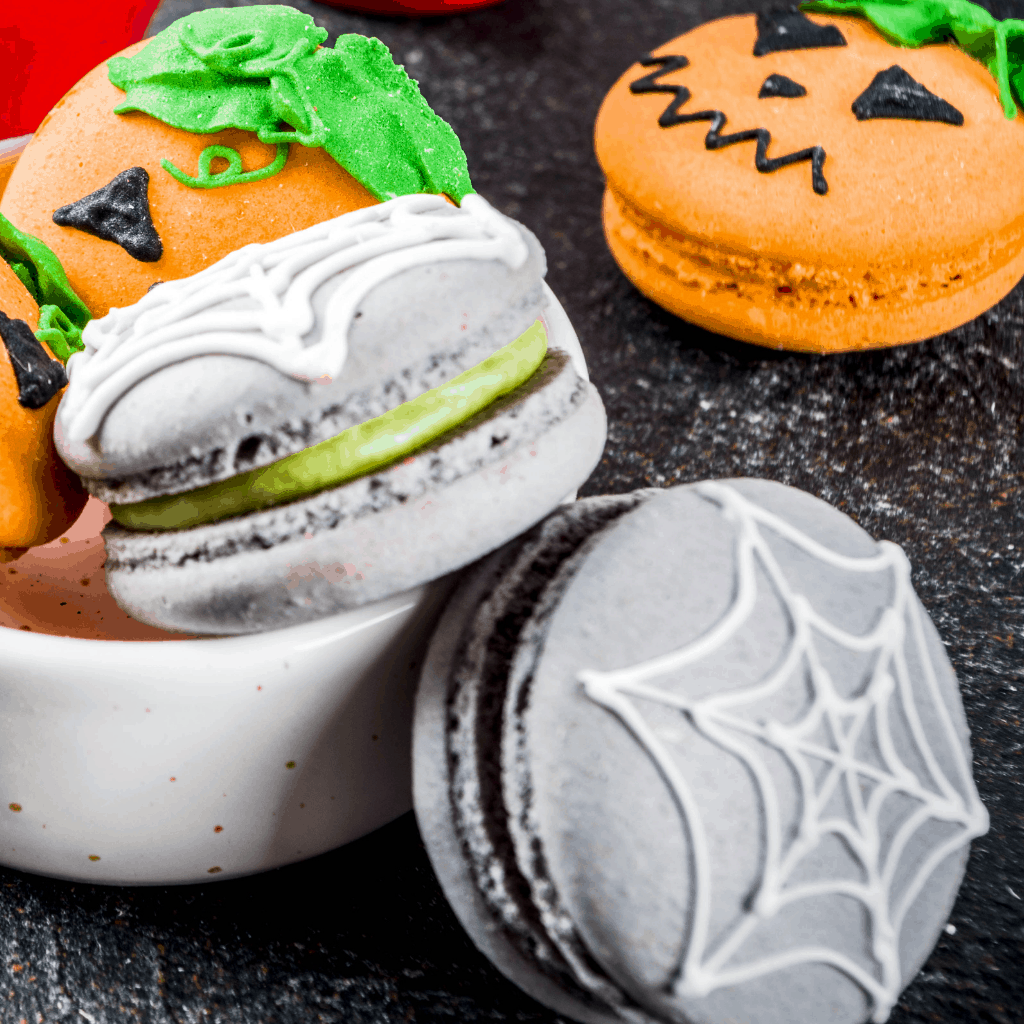
- To make the leaf: Hold the piping bag with green-colored icing diagonally above the orange-colored macarons. Squeeze out the icing, touching the surface of the cookie, then move your hand going in one direction as to where you want the leaf to position before lifting off and stop squeezing.
- Repeat a few more times. Do the same on other macarons
- To make the face: Hold the piping bag with black colored icing vertically above the macarons. Then just below the "green leaves" pipe out to make 2 small triangles to make the eyes, a smaller triangle at the middle as the nose. Then make a zigzag line below the triangles as the mouth.
- To make the cobweb design: Hold the piping bag with white-colored icing vertically above the silver-colored macarons. Make 3 lines from the edge straight to the opposite edge. then connect them with lines to look like a cobweb.
- To make the ghost design: Hold the piping bag with white-colored icing vertically above the silver-colored macarons. Make an outline of a ghost figure then fill the whole figure with white icing.
- Refrigerate for at least 10 minutes or until the icing is set.
- Keep the macarons in an airtight container in the refrigerator for 24-48 hours to allow them to “mature”.
Notes
THE TOOLS
- Digital Weighing Scale
- Template
- Silicone Mat
- 7 piping bags with the following tips:
- 4 with a medium-size round tip. - 2 for piping out the cookie and 2 for piping out the fillings
- 2 with small round tip - 1 for white icing and 1 for black icing. For decorations.
- And 1 is a leaf piping tip. It looks like a long narrow slit on the tip - for green icing to make leaf decoration
Nutrition Information:
Yield:
12Serving Size:
1Amount Per Serving: Calories: 338Total Fat: 12gSaturated Fat: 6gTrans Fat: 0gUnsaturated Fat: 5gCholesterol: 54mgSodium: 148mgCarbohydrates: 57gFiber: 1gSugar: 53gProtein: 3g