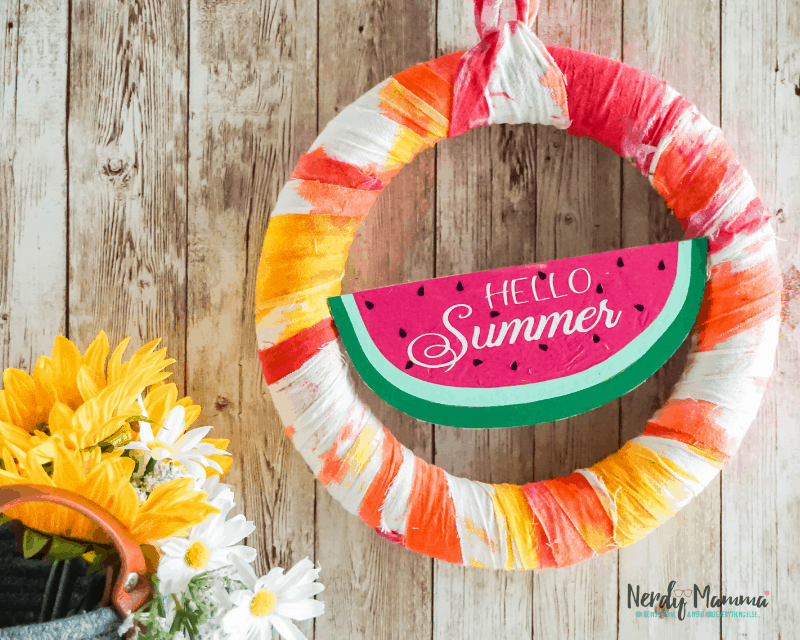
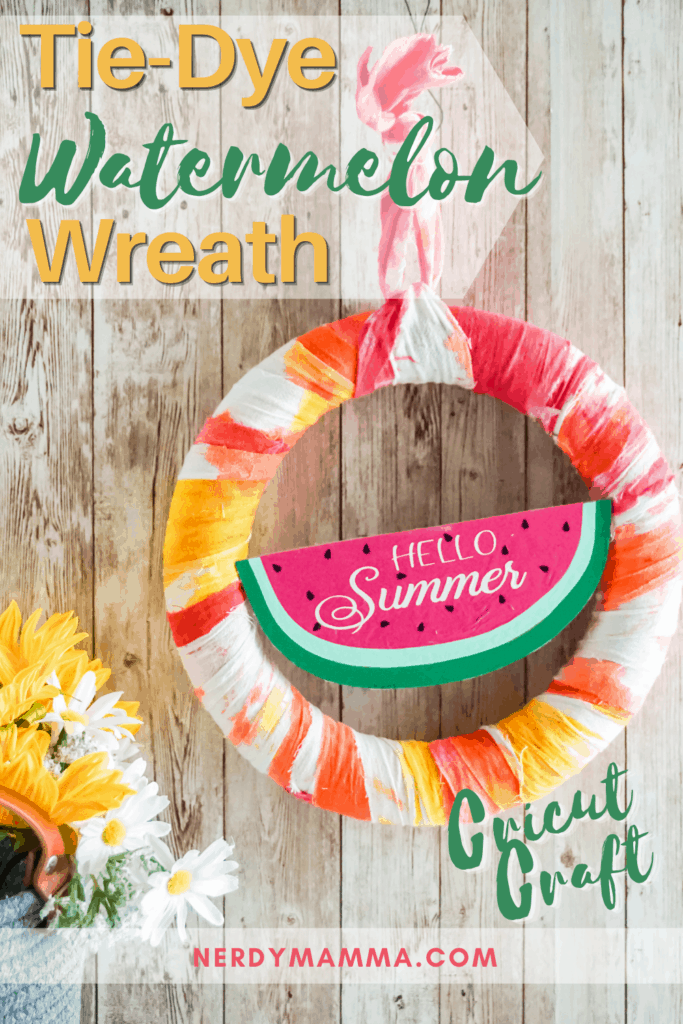
This interesting Tie-Dye Watermelon Wreath is perfect to welcome the coming summer.
Watermelons are a very refreshing fruit. They are always served as healthy snacks and refreshments. Moreover, the fruit symbolizes the summer season.
And so, I think it’s time to display that symbol! This Tie-Dye Watermelon Wreath is just perfect. To make it a lot easier, I used my Cricut machine.
The first time I tried making this Cricut craft was no big deal. You may think that is because I am already good with crafts. Nah! I just have a little bit of experience… Lol!
Seriously. If you just follow the instructions, then, you will find making this craft very easy.

When you’re done with this Tie-Dye Watermelon Wreath Cricut Craft, display it on your wall and have the Watermelon Slushy ready, too. The combination of these two definitely bring out the Summer atmosphere.
Making the Tie-Dye Watermelon Wreath
To make this craft, have the supplies ready first. They are listed below. For crafters out there, you know where to find them. For beginners, you can easily find them in craft stores or online.
You will also need the tools listed below.
Supplies:
- 6-8 inch Round Foam Wreath Form
- 1 Cotton Kitchen Cloth
- Tie-Dye Set (pink, yellow, and orange)
- Dark Green Heat Transfer Vinyl
- Light Green Heat Transfer Vinyl
- Black Heat Transfer Vinyl
- Pink Heat Transfer Vinyl
- 1 Piece Chipboard
- 2 Cake Pop Sticks or Small Dowel
Tools:
- Sharp Scissors
- Cricut Maker or Explore Air 2 with Deep Cut Blade
- Large Bowl
- 4-5 Small Rubber Bands
- Hot Glue Gun & Glue
- Transfer Tape
- Easy Press Mini or Easy Press 2
The instructions are easy to understand along with the images. I did enjoy making this Tie-Dye Watermelon Wreath and I love how easy it was to make. I’m proud to look at it hanging on my front door, and I’m excited to share this activity with y’all!
Instructions to make the Tie-Dye Watermelon Wreath
- To begin with, tie-dye your kitchen towel. Twist it up and wrap the rubber bands around the center of your bundle in 4-5 places then place it in the bowl.
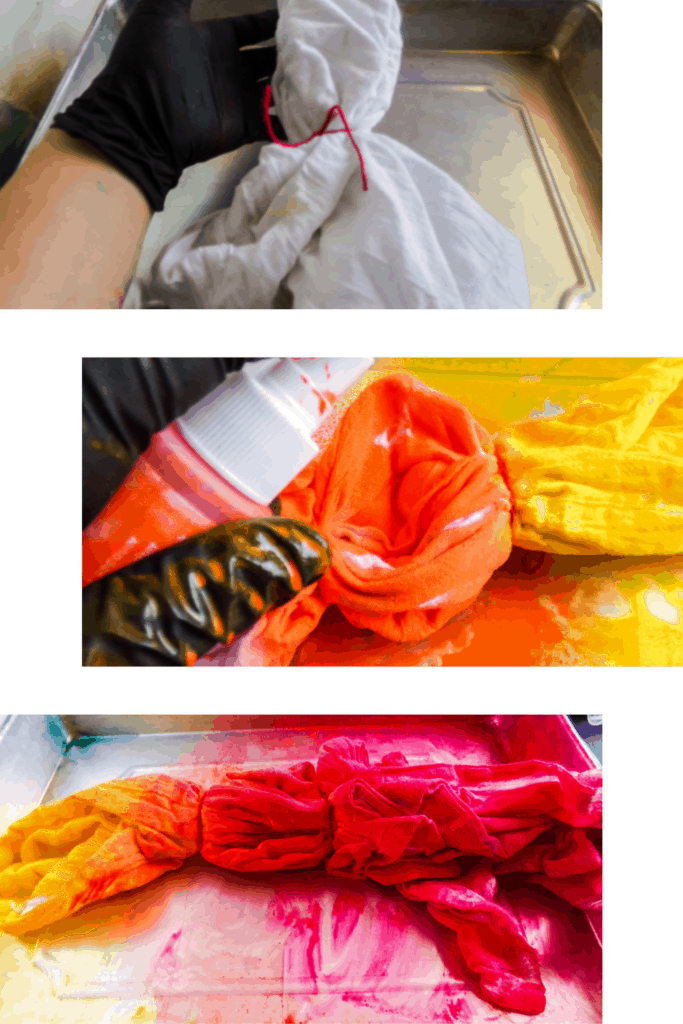
Either spray or pour (my preferred method, honestly) the dye onto your towel, saturating the towel in multiple places with the orange dye, yellow dye and pink dye, individually.
Allow the tie-dyed towel to dry completely before it again. You will probably want to leave it overnight, or maybe longer, depending on the temperature and humidity.
Using the Cricut Machine
While the towel is drying, go ahead and make your watermelon by downloading the SVG file. Immediately load the SVG file into Design Space, then insert the image for a new project.
Select the lettering for Hello Summer and click “weld” in the bottom right corner to have the Cricut cut the lettering as one element so it’s easier to deal with.
Click “Make It” in Design Space, and then set the material type on the machine to “Vinyl”. Follow prompts to load and cut. Unload when finished cutting. Once the design is cut, if you need to trim away any excess vinyl, do so now.
There is a brown piece to the SVG file–cut this from the chipboard by loading your deep-cut knife blade to the machine and then changing the material in Design Space to the chipboard.
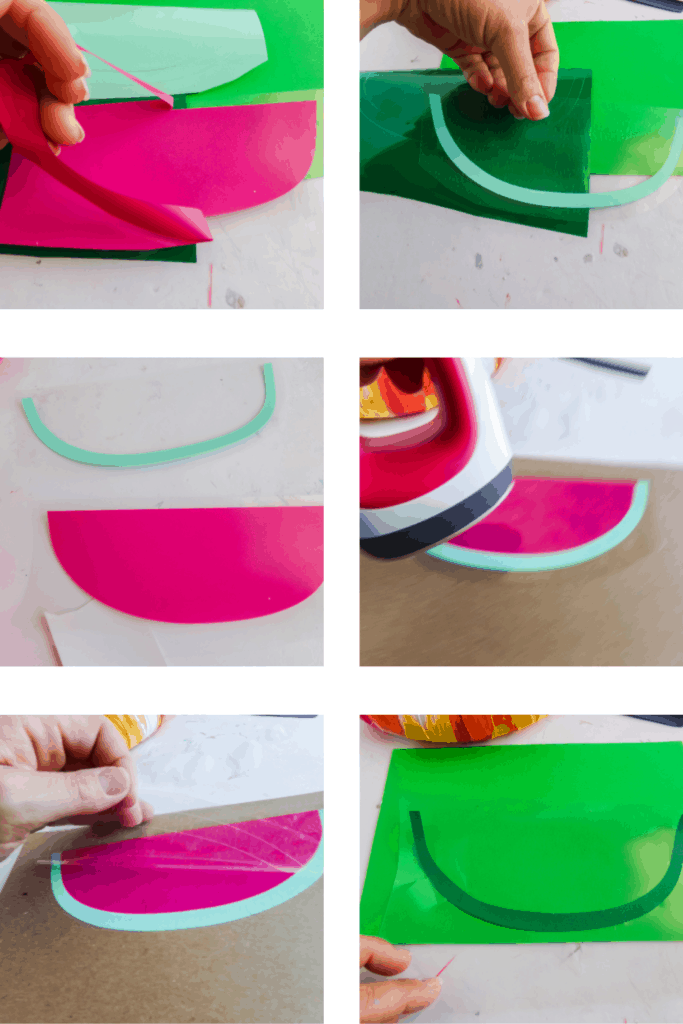
Layer your vinyl onto transfer tape, checking and readjusting often to get the watermelon parts in place the way you want it to look, because you want it to look as close to perfect as you can.
Then place the chipboard onto the transfer tape with the layered vinyl and use your heat press to lock it in place. Remove the transfer tape and discard.
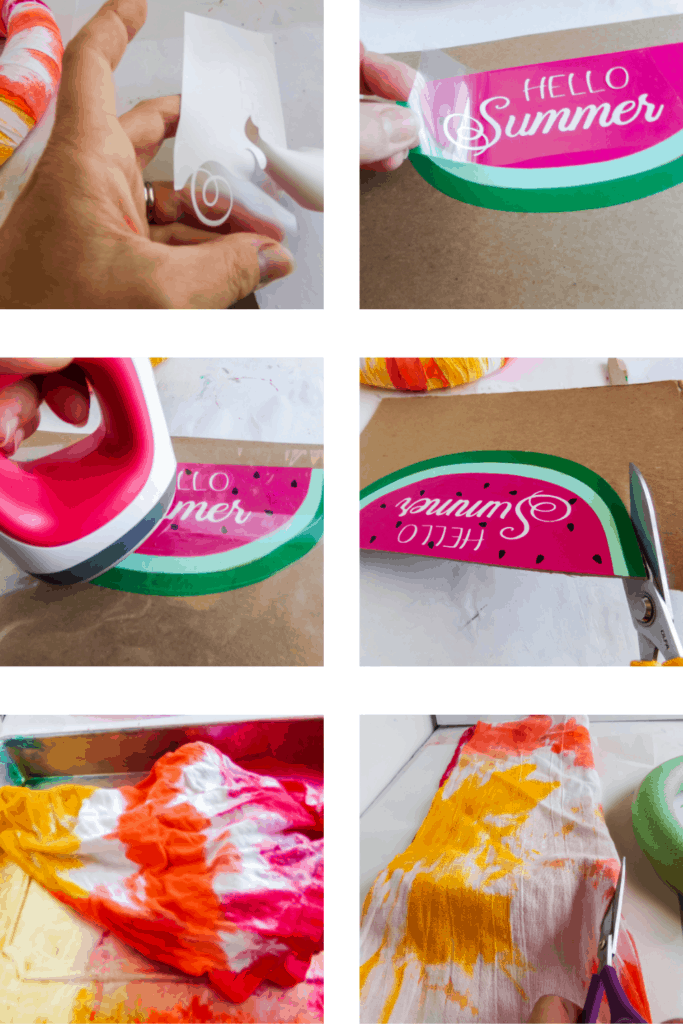
Once your tie-dyed towel is dry, iron it if desired, to set in the colors. Then cut the towel into 2-inch (approximately) wide strips.
Hot glue the strips onto the foam form, wrapping it around snugly as you go. I only used about 1/2 of the towel and I wrapped the outer edge of the strips over onto itself so that I had a nice, clean edge.
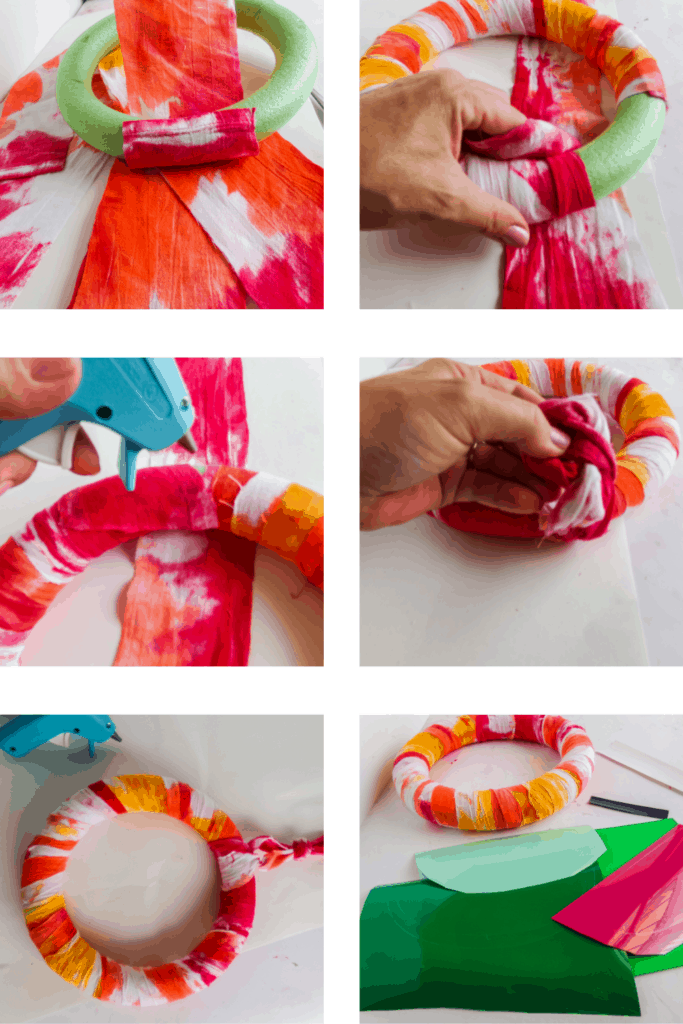
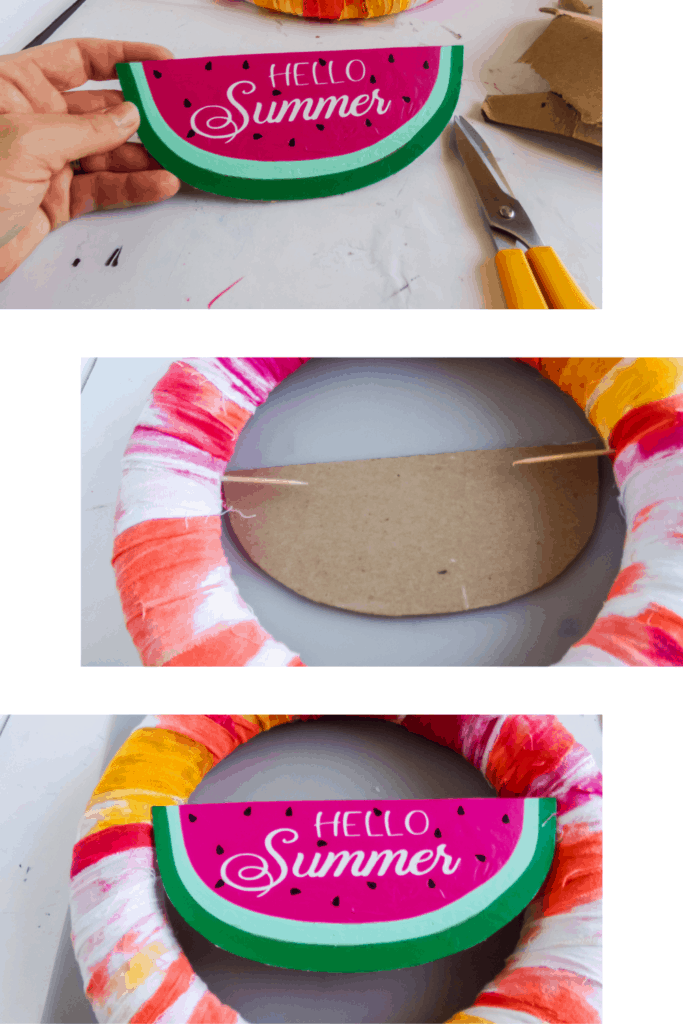
Once the form is completely wrapped, hot glue the watermelon in place on the front of the wreath using cake pop sticks or dowel pieces to hold it in place in the center of the wreath.
Use one of the remaining strips of the towel to make a hanger loop on the top of the wreath and enjoy!
If it’s still confusing, need more clarification, or whatever, just ask away in the comment down below. I love to answer back.
While gathering the materials and tools needed, or if prefer to do create this craft later, Pin this activity into your Summer Crafts Pinterest Board to make it easier for you to get back.

Tie-Dye Watermelon Wreath
This Tie-Dye Watermelon Wreath Cricut Craft is absolutely fun to make and perfect to welcome Summer.
Tools
- Sharp Scissors
- Cricut Maker or Explore Air 2 with Deep Cut Blade
- Large Bowl
- 4-5 Small Rubber Bands
- Hot Glue Gun & Glue
- Transfer Tape
- Easy Press Mini or Easy Press 2
Instructions
- Start by tie-dyeing your kitchen towel. Twist it up and wrap the rubber bands around the center of your bundle in 4-5 places then place it in the bowl.
- Either spray or pour (my preferred method, honestly) the dye onto your towel, saturating the towel in multiple places with the orange dye, yellow dye or pink dye, individually. Allow the tie-dyed towel to dry completely before moving it again.
- While the towel is drying, go ahead and make your watermelon by downloading the SVG file. Immediately load the SVG file into Design Space, then insert the image for a new project.
- Select the lettering for Hello Summer and click "weld" in the bottom right corner to have the Cricut cut the lettering as one element so it's easier to deal with.
- Click “Make It” in Design Space, and set the material type on the machine to “Vinyl”. Follow prompts to load and cut. Unload when finished cutting. Once the design is cut, if you need to trim excess vinyl, do so now.
- There is a brown piece to the SVG file--cut this from the chipboard by loading your deep-cut knife blade to the machine and changing the material in Design Space to the chipboard.
- Layer your vinyl onto transfer tape, checking and readjusting often to get the watermelon parts in place the way you want it to look.
- Place the chipboard onto the transfer tape with the layered vinyl and use your heat press to lock it in place. Remove the transfer tape and discard.
- Once your tie-dyed towel is dry, iron it, if desired to set in the colors. Then cut the towel into 2-inch (approximately) wide strips.
- Hot glue the strips onto the foam form, wrapping it around snugly as you go. I only used about 1/2 of the towel and I wrapped the outer edge of the strips over onto itself so that I had a nice, clean edge.
- Once the form is completely wrapped, hot glue the watermelon in place on the front of the wreath using cake pop sticks or dowel pieces to hold it in place in the center of the wreath.
- Use one of the remaining strips of the towel to make a hanger loop on the top of the wreath and enjoy!
Have fun!
Looking for something to munch on this summer? Check these!
Homemade Blackberry Ice Cream {Dairy Free}

Easy Kiwi Slushy Recipe

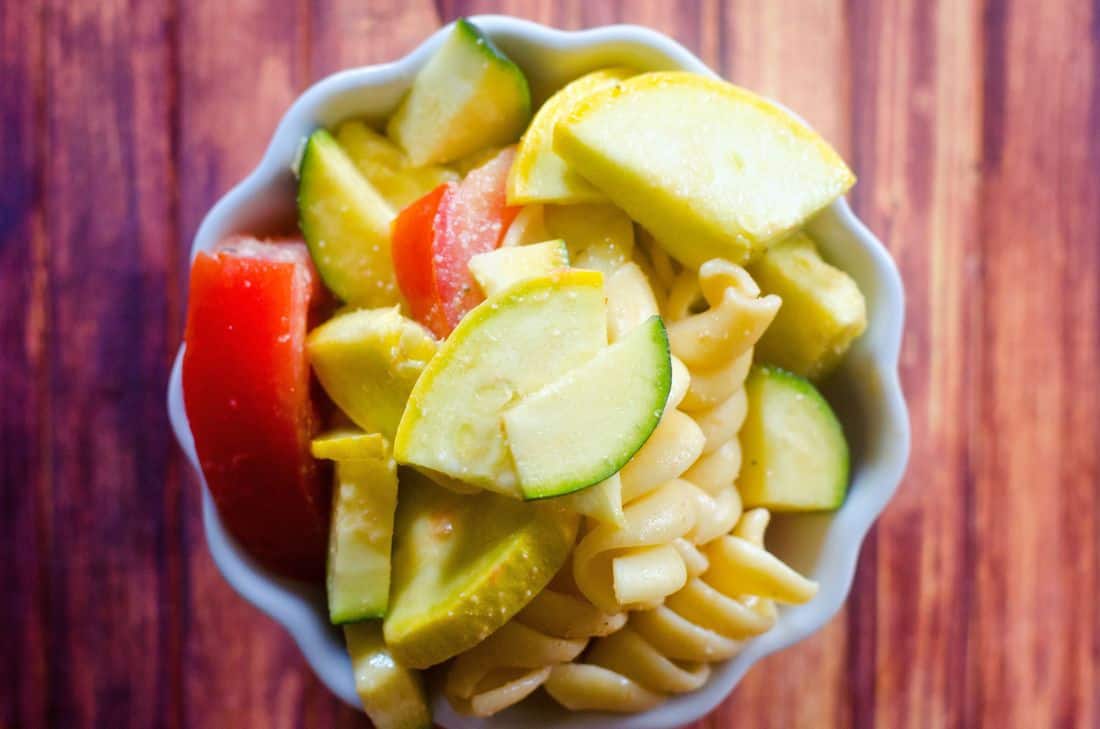
Summer Pasta Salad